Wii Hacking Example
1
99 Lives in Mario Galaxy
By dexter0
Last Updated: 6/6/2008
Quick Note
DO NOT PM me with questions regarding the material in this text or Wii hacking in general. If you want to know why this is bad
read this. I recommend that those seeking help visit one of the
various forums dedicated to Nintendo systems hacking (I am a member of a few of
them).
Notice
Please make sure you have read my WiiRd Hacking
Tutorial before starting this example. You need to be familiar with the WiiRd code types along with general hacking topics such as
Hex.
Changelog
6/6/08 - Initial release
Before
You Begin
----------------
We
Need To Prepare A Few Things
We are now actually going to hack a game
with WiiRd to get a hands on
example of all that boring stuff you just learned and to understand concepts
which knowledge of hex and code types alone will not teach you. I highly
recommend that you follow along with your copy of WiiRd.
Now before we get started we need a few things.
The WiiRd
hacking tutorial told you to install your Gecko drivers so I am assuming you
already did, right? Now drivers are only half the package. We also need to get
ourselves a copy of WiiRd if you don't already have it. We also need a
method to boot up the game with the cheat engine. I recommend you grab the
latest Gecko OS that is compatible with WiiRd here.
Also, I recommend you install the Homebrew Channel to provide a quick way to boot up game you
want to hack with the Gecko OS. Trust me, it is a lot
faster than using that old Twilight
Hack. Got all that? Good, let's get started.
Example 1 (Infinite
Lives)
----------------
Yes, I know it is one of the easiest codes
to make but this tutorial is geared towards beginners. Today we are going to be
making an infinite lives code for Super Mario Galaxy. I have an NTSC Wii but you can follow along if you have a PAL or JAP Wii. Our code address just might be different.
Getting Started
I am going to use the homebrew channel to launch the Gecko OS. If you are using
the twilight hack to boot the OS, skip step 1.
1. Start up your Wii and run the homebrew channel.
Scroll over until you find the Gecko OS homebrew application and load it.
2. Once the Gecko OS has started insert Mario Galaxy. Wait a few seconds and
click the A button on your primary Wii Remote to
start the game.
3. Once the screen pops up advising you not to smash your Wii
Remote into random objects along with other warnings, launch WiiRd.
A Tour Of WiiRd
Well, actually we are only going to be looking at the "Code Search"
and "GCT Codes" tabs. In later tutorials we may use the "Pointer
Search", "Memory Viewer", and other tabs.
- Code Search
- The items found in the
- Value Type
- The Value Type group tells WiiRd what kind of search we are performing. If you
know exactly what value you are looking for, a Specific Value search is
for you. If your not sure exactly what value you
want, you'll have to stick with an Unknown Value search.
- Data Size
- You need to tell WiiRd
what size a value you want it to look for and you need to stay consistent
throughout all your searches. If you change the Data Size, all your
search values will be reset meaning you'll have to start over.
- Compare Type
- Pretty self explanatory. This tells WiiRd how to compare the values of the current search
to those of the last. Am I looking for value equal to the previous ones?
Not Equal to them? Greater? Less than? You also
can use these with a Specific Value search. Do I want all values greater
than 01? Normally, you will leave the Compare Type at Equal when
performing a Specific Value search.
- Start/Restart
- The start button is the first one you press
when you start searching. It sets up your initial search. Once you have
performed one search, it changes to a restart button.
- Search
- Tells WiiRd to
perform another search.
- Undo
- Rolls back the last search you did so the
search before it becomes the last search. Useful if you know you messed
up. However it only works one time. You do not have infinite undo.
- Poke
- Allows you to Poke or 'change once' a user
defined address in the RAM to the User's choice of value.
- GCT Codes
- Add New Code
- WiiRd keeps it's own internal code list for
every game you make a code for. No more having to make a GCT file every
time you want to test a new code. The Add New Code button creates a new
code that you then add all the code lines to in the box to your right. To
remove a code, simply right click on it and select Delete. To rename a
code, just double click on its name.
- Move Up/Down
- Order does matter in certain cases. Sometimes
a code is dependent on another code that must be executed before it does.
That is where the Move buttons come in handy. They let you shift your
code execution order around. The same holds true for the Move Up/Down
buttons on the right side of the window that reorder
individual code lines.
- Load Code List
- Reloads the codes displayed in this tab with
any new updates that have been made to the actual code file WiiRd automatically generates.
- Save Code List
- Saves any changes you have made to the code
list from the GUI to the actual code file. WiiRd
will also save any changes to the code file when it closes.
- Apply Codes
- Uploads all enabled codes to the USB Gecko
for execution.
- Turn off all codes
- Removes all codes from the USB Gecko and
stops their execution.
- Add Code
- Press this button after typing in a new line
for the currently selected code to have it added at the bottom of the
list.
Creating The
code
Now that the game has loaded, select a file that preferably is not new and
click start. We need to start searching the game's memory to find what address
holds the number of lives. Turn your attention back to WiiRd.
Let's perform our initial search. Since we know how many lives we have as the
game is nice enough to write it out onto the screen we are going to use a
"Specific Value" search so make sure "Specific Value" is
selected from the Value Type. Next we need to set our search size. I am going
to guess that lives is a 16-bit value so select
"16 bits" from the Data Size. Now why did I guess lives
is a 16-bit value you ask? Past experience with other
games. Trust me, as you hack more codes you will learn to make educated
guesses like these.
We also need to provide WiiRd with that specific value we intend it to search for.
If you look back at Mario Galaxy you can see we have four lives so enter 4 in
the box and click the "Convert Dec to Hex" button to automatically
have it convert 4 into hex (which is just 4) and pad it to 16-bits. Also, make
sure the
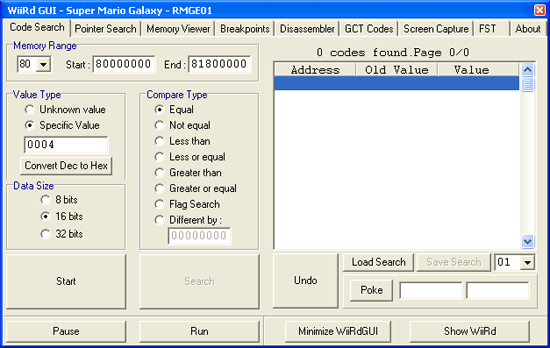
The Code Search Window
That is waaaay
to may results we came up with. We need to drastically narrow down our
possibilities to under 20 before we can even think of manually checking each
one. So we need to change the number of lives we have and get another memory
dump. Head over behind the stairs leading up to the kitchen and grab the free
life.
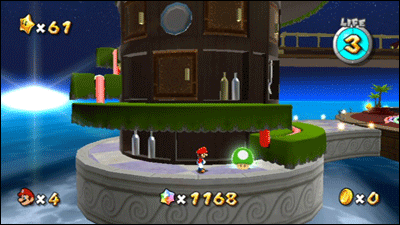
Mario finds an extra life
Got It? Good, your number of lives is now
5. Let's take another memory dump. Seeing as though we now have five lives,
change the 4 to a 5 in the specific value text box leaving the three 0s before
it alone. Once that's done, click the "Search" button. After WiiRd finishes comparing all the previous results to the
new value you should be left with very few results. I actually had four left
when I attempted this. Let's see if we can cut it down to one by performing
another search.
Go ahead and get yourself into a level
where you can loose lives. I am going to head into the kitchen and fly to the
Ghostly Galaxy. Once you are inside the galaxy, find a way to loose a life.
Once you have been respawned,
you now will have four lives again. Perform another search with the specific
value back at 4. You should now have one result.
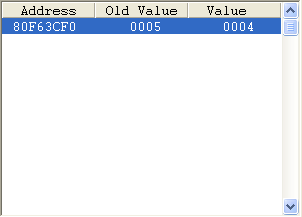
The Results Window
You can see our 1 address and it's values during the last search and the search before it
as represented by the Value and Old Value columns. The address I came up with
was 0x80F63CF0. If you got a different address don't worry. Now, we need to
test our address. To do this we are going to poke the memory address with a
different value and see what happens.
Now before we go on I would like to pause and talk about alignment. As
you remember each byte in memory, or every 8-bit
number has a unique address in memory that identifies it from the rest. What
you need to understand is that if each byte (8-bit number) has a unique address
in memory than a 16-bit number contains two addresses in memory, one for each
of its bytes. And guess what? A 32-bit number contains four addresses in
memory, one for each of its four bytes. Now the key part of this is that the
address of a 32-bit or 16-bit value is the exact same address as the first
8-bit value in the number. That means that if you were to just ignore all 3 or
1 other digits in a 32-bit or 16-bit number and just look at those first two
digits, the address of the big 32-bit or 16-bit number would be the exact same
address as the one those first two digits reside at. Remember that.
Consider the 32-bit number 12345678 at the address of
80000000. Remember, this means that 12 is the 8-bit value at 80000000. But what
about 34 56 78 (Noticed, I spaced them apart)? Where do they reside? Well just
increase the address by one to get the next byte (2 digits) of the 32-bit
number. So, can you guess where the byte 34 actually resides in memory? It's
not 80000000 but actually 80000001. The byte 56 would therefore by at 80000002
and 78 at 80000003. 16-bit numbers are the exact same except a 16-bit number
contains only 2 bytes. So, if we had the 16-bit number 1234 at address 80000000
then the byte 12 would be at 80000000 and the byte 34 would be at 80000001.
What you also need to understand is that data is what you make it. If I came
across 97 00 06 89 A6 F8 in memory I would not have a clue what that data is.
It could be 8 8-bit numbers. It could be 3 16-bit numbers. It could be a 32-bit
number and 2 8-bit numbers or a 32-bit number and a 16-bit number. I don't
know.
So lets bring our current example back into
this alignment discussion. As you remember, we have discovered our lives
address is at 80F63CF0 and the current value is 0004. Remember, we have been
performing 16-bit searches. It is extremely important to remember the search
size when you are aligning values. If you remember what you just learned you
should be able to tell me where that actual byte that contains our number of
lives is. It's not at 80F63CF0 but at 80F63CF1. But it is just as valid to say
that lives is at 80F63CF0 with a value of 0x0004. The
key is the extra two zeros at the beginning of the value. If you told me that
lives was at 80F63CF0 with a value of 0x04 then you would be wrong. You should
understand exactly why this would be wrong too. What we doing by adding on
those extra two zeros so we can say that lives is at 80F63CF0 with a value of
0x0004 is called aligning. It
would also be just as valid to say that lives is at
80F63CEE with a value of 0x00000004.
But wait! Would you question me if I told you that lives
is at 80F63CF0 with a value of 0x00040000? That is also perfectly legal too.
You may wonder why we would want to add four extra zeros onto the end of what
could have been a perfect 16-bit number and all I can say is there is no reason
why any more. Back when we
used the older Gecko Client, it demanded all values be aligned to 32-bit size
before we could poke with it. That's why we needed this trick. However, WiiRd is much more advanced now and can work with 8 or 16
bit numbers along with 32 bit numbers.
Go ahead and enter the address of our
lives value into the text box next to the "Poke" button or just right
click on the address in the results window and choose "Poke" to have WiiRd automatically type the address in for you. Now we
need a value. How about 99? BUT WAIT! GUESS WHAT (you know what's coming)? It
needs to be in HEX! If you are to lazy to convert 99
to HEX it comes out to be 0x63. Now we need to pad/align it to a 16-bit value
since we have been doing 16-bit searches so you will end up with 0x0063. Enter
that into the Value box without the 0x as WiiRd
expects HEX. Click "Poke".
![]()
The Poke Box.
You will see your number of lives go to 99
and this means that our address is valid. Yay! Now we
need to make a code out of it. Click your way on over to the "GCT
Codes" tab.
Unlike, the old Gecko Client, WiiRd has a built in code editor for quick testing of
codes. Let's add a new code for our 99 Lives hack by clicking the "Add New
Code" button. Then double click on the name that WiiRd
assigned the new code to rename it to something more appropriate like "99
Lives".
Since we always want to
have 99 lives let's use the constant write code from our code type arsenal. But which constant write code to use? You actually
could use any of them. If you want an 8-bit constant write you would need to
shift your address up 1 to 0x80F63CF1 since as we learned earlier that is where
the byte value for lives really is. If you want a 16-bit constant write you
could use our current address. And if you want a 32-bit write you could shift
the address down by 2 (which I would not recommend because the game is storing
data there) or you could use our current address and tack on those 4 extra 0s
like I showed you in my alignment blurb. I will opt for the 32-bit option
(adding extra zeros to pad it) so my code becomes 14F63CF0 00630000. So what
happened to the 8 at the beginning. Well remember that
the 14 code type adds the address we specify (F63CF0) to whatever address is in
the P.O. Normally, this would be 80000000 but we can't always assume so. After
all somebody else's code might be poorly written and not reset the P.O. value
after messing with it. So we will reset it ourselves. Remember the 4A00 code
type? We are going to use it like so: 4A000000 80000000. That will force the
P.O. to be 80000000.
So in the text box above the "Add
Code" button, enter the code line to reset the P.O. value since that needs
to come first. Also, omit the space between the address portion of the code and
the value portion (0 and 8) when you are typing in the code line into the box.
Click "Add Code" and repeat for our constant write code line
(14F63CF000630000).

Our Completed Code
So now let's fire up our new code. Right
click on the "99 Lives" code in our list and select "Enable
Code". Two stars will appear next to the two lines of code in the right
list meaning that those lines have been enabled. Click the "Apply
Codes" button. Mario now has 99 lives. Congratulations, you have just
created your first code. Pat yourself on the back, it was not easy. Enjoy your
new code!
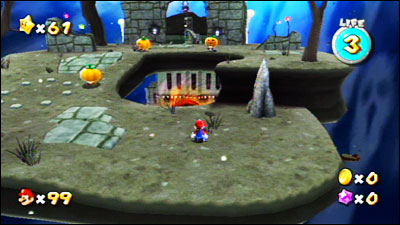
Mario with 99 lives
And with that, this example is concluded.
Coming
Up Next...
----------------
In the next example (soon to be released) we are once again going to hack Super Mario Galaxy as we attempt to give Mario unlimited health. I will teach you all about Pointers and how to use them along with introducing you to a few new code types.